I was inspired by a blog post on John Bond's Wargaming Stuff blog on how to make your own cornfields for 28mm wargaming. I have been hesitant to spend more on model railroad cornstalks (JTT 2" O scale). They certainly look great but can get pricey for the amount of corn stalks I want to have on the table. I have also not been very successful creating cornfields using other techniques, so I am giving John's technique a go.
I was surprised that John spotted a fake IKEA plant (FEJKA) that can be easily used as corn stalks. I have an IKEA close by, so popped in there, bought the plant and have been trying out John's technique. I tried to follow the process exactly, but ended up changing it up slightly. I explain my process in the video below. I bet there are more improvements other people will come up, but it is pretty easy and fast to go through this process. Basing wise, I'm probably going to try out using rubber floor mat material. I first saw it in action on Black Magic Craft YouTube channel: Link.
My video below on how to make these corn stalks.
I will post an update once I finish a cornfield terrain piece.
It may be surprising, but I have never painted a complete infantry unit in acrylics. I have always used Humbrol or Testors enamels, but this time I thought I'd give Vellejo acrylics a go for a 28mm unit of French in the French and Indian War.
The 28mm miniatures are AW Miniatures.
I purchased the Painting War book on the French and Indian War and attempted to use the recommended paints and technique. I failed completely trying the technique (base and two highlights) and using the recommended paints. I stuck with the acrylics, but instead chose some of the recommended paints. I seem to like the look of a base coat with a wash.
My process:
Black primer. I may switch to a grey primer. I typically use a grey primer.
Base coats.
Selective wash in areas. I use Strong Tone by The Army Painter.
Highlight in selective areas, which can be a base color or other.
Basing.
First try at this, so I guess I can only get better.
In November I hosted an online miniatures test game for some friends. It was the Battle of St. Denis, a historic battle between the British and French Patriots in Lower Canada (now Quebec, Canada) on November 23 1837. I used the Rebels and Patriots rules with 28mm miniatures, with two players a side. The French were defending, with the British trying to defeat the rebels.
I had never done an online web game with webcams of one of my miniature games. I did some testing myself beforehand, but had no clue how things would run with four other people online. I used the free program Jitsi as my interface for us to interact through. They rolled the necessary dice, explained what they wanted to do and I tried to run the game just like in person.
Video of the background to the historic battle and initial setup.
Here is how the game went...
The initial layout with the British four line infantry (two of them veteran) companies and a 24pdr howitzer on the left. The French were defending the outskirts of town with four line units, a skirmish unit and two units with only farm implements.
The British advanced a third of the way across the battlefield and started to take fire.
The British were now starting to fire back with all their infantry and the howitzer. An infantry company took advantage of cover in a farm house and barn during the advance.
British troops advanced closer to the French defending the fences to apply more pressure.
The British infantry in the open were starting to take losses.
Due to losses a British unit retreated from the battlefield.
The British Commander with his company charged the unit with French Commander and caused it to withdraw from the battle.
Even with the French Commander not on the battlefield, the French continued to fight on.
With the British advancing on the main stone building the French with improvised weapons charged the British Commander's unit, causing it to withdraw.
Another British company advanced on the stone building, but French inside caused significant casualties and the British withdrew.
Due to casualties and getting low on ammunition, the British withdrew. A French victory!
The battle played out pretty much as the real battle did. I think the rules worked out well for the battle and for the online game. It certainly takes more effort for the GM. The game lasted maybe 4.5 hours when in person I think it could have been finished in three. Using Jitsi was very successful with just the normal connection issues people have. Having an overview camera and a close up camera worked, but I think there might be a better way to do the close up camera. Having a second person helping me do the camera work would be the way to go. I think 28mm battles are the best for online miniature games. Anything smaller and it would be more difficult for players to play.
This is the first Rebels and Patriots game I've run and I think the key is cover. Being shot in the open can be rough, but for the period, lines in the open was standard practice.
Thanks to all those who participated and who knows, maybe I'll run another online game in the future. My preference is definitely in person, but this has proven I can run an online game. Also a great opportunity to game with friends from far off places. I recommend using a simple ruleset and the Jitsi online program with one or two HD webcams.
This battle was fought during the Lower Canada Rebellion in the town of St. Denis on the Richelieu River. French Patriots decided to make a stand against British forces in the town on November 23, 1837. The British had two companies from the 24th Regiment with a Royal Artillery cannon (which I believe was a 5.4" howitzer). The Patriots had about 800 men, half were armed with muskets. The other half were only armed with scythes, pitchforks and clubs.
The British made some success, but eventually withdrew due to casualties and low ammunition. The cannon was stuck in the mud and had to be left behind. The Patriots eventually left the town and the British captured it at the beginning of December.
This was the only victory for the Patriots in the rebellion.
I put together a Rebels and Patriots rules scenario of this battle. I bought 28mm miniatures for the battle. I did not have a good selection of buildings so made up two of the historic buildings (still surviving today).
Scenario Order of Battle
British
Patriots
Lieutenant-Colonel Gore
Heroic Leader
+2 bonus
-1 on officer casualty roll
Light Artillery
24pdr howitzer
4 crew
Line Infantry
veteran
Line Infantry
veteran
Line Infantry
Line Infantry
22 points
Wolfred Nelson Skirmish Leader
Once per game, 1 unit within 12” may re-roll a failed skirm. activation or evade reaction.
Skirmishers
Line Infantry
Line Infantry
Line Infantry
Line Infantry
Line Infantry
no muskets
Line Infantry
no muskets
22 points
Infantry with no muskets is not in the rules. I made two units of Line Infantry have no muskets and only able to fight in close combat. These units I set to two points each rather the normal four points each.
I wrapped up building my first two 28mm scratch built buildings. They are not perfect, but I think I built them to a wargaming quality. Hopefully in the near future they will get in a battle.
I hope everyone is staying healthy and getting in good hobby time. I thought I'd be getting in more hobby time, but still working and now teaching school work to my daughter. But, I am still painting and building terrain.
I continue to make progress on my Lower Canada 1837 Rebellion project. It is for a historic battle that took place in what is now Quebec between Patriots and British soldiers. I have finished painting up both sides in 28mm and continue to work on some homemade buildings. Below are a few pictures of the buildings. This is for a Rebels and Patriots rules scenario.
The bottom of house is not fixed so models can be placed on it.
The bottom of house to place miniatures.
Large building under construction. This uses a
mix of foam board, doll house textured stone
paper and floors printed on heavy weight paper.
I'm thinking I may do a video showing the various miniatures and buildings.
I have been in various discussions regarding historical wargaming miniature scales and why gamers choose certain scales. We should choose the scale we want to. We all have our reasons for picking a certain scale whether it is for land, air, or naval battles. I've ended up with all sorts of scale miniatures.
Here are my reasons for picking my scales in order of decision making:
I have a battle in mind that I want to wargame. Do I have some of the miniatures in a scale already?
What rules will I use? Sometimes rules are designed to use a range of scales.
Is there a company which supplies all the needed miniatures for the battle. If only one company has the needed miniatures, then I am stuck with that scale. If this scale results in too many miniatures to paint or too few, then I probably will not do the battle (examples: Jutland or Gettysburg).
What is the size of the battle? To cover the whole battle maybe painting up 6mm or 15mm will work. If it is a small battle, maybe 28mm as a skirmish battle will work. 28mm could also work for a big battle, but do a portion of the main battle.
Based on the figure count, will it cost too much or result in me painting for years? If so, then don't move forward with this possible project.
This is my current scale variety in my collection:
Naval
1:600 - ACW
1:1000 - Russo-Japanese War
1:1200 - Age of Sail (2 ships), War of the Triple Alliance
1:2400 - WWI, WWII
Air
1:144 - WWII, Korean War, Vietnam
1:600 - WWII
1:1200 - WWII
1:2400 - WWII
Land
28mm - War of 1812, Philippine-American War, Rebellions of 1837-1838
25mm - Aztec-Conquistador
15mm - Boer War, Crimean War, Battle of Flodden, War of 1812, Italian War of 1859
10/12mm - Vietnam, WWI, WWII, Korean War
3mm - Guns for War of the Triple Alliance (1 stand)
I have others unpainted periods that will expand this list. In the future I can see myself adding 6mm.
I used to have 1:72 / 20mm WWII which I used with Rapid Fire, but decided to bail on that for something smaller (10mm) with Blitzkrieg Commander ruleset. I found it looked better for the battles I wanted to do. Also, so much easier to store these miniatures.
What scales would I recommend staying clear of? I think scales smaller than 6mm (land) and smaller than 1:1200 (air). Naval wise, I think all the scales are fine. My struggle is when the ship models get large and lack the maneuver room on the table (i.e. 1:1000 Russo-Japanese capital ships). I guess I struggle getting excited about miniatures I can't tell what they are.
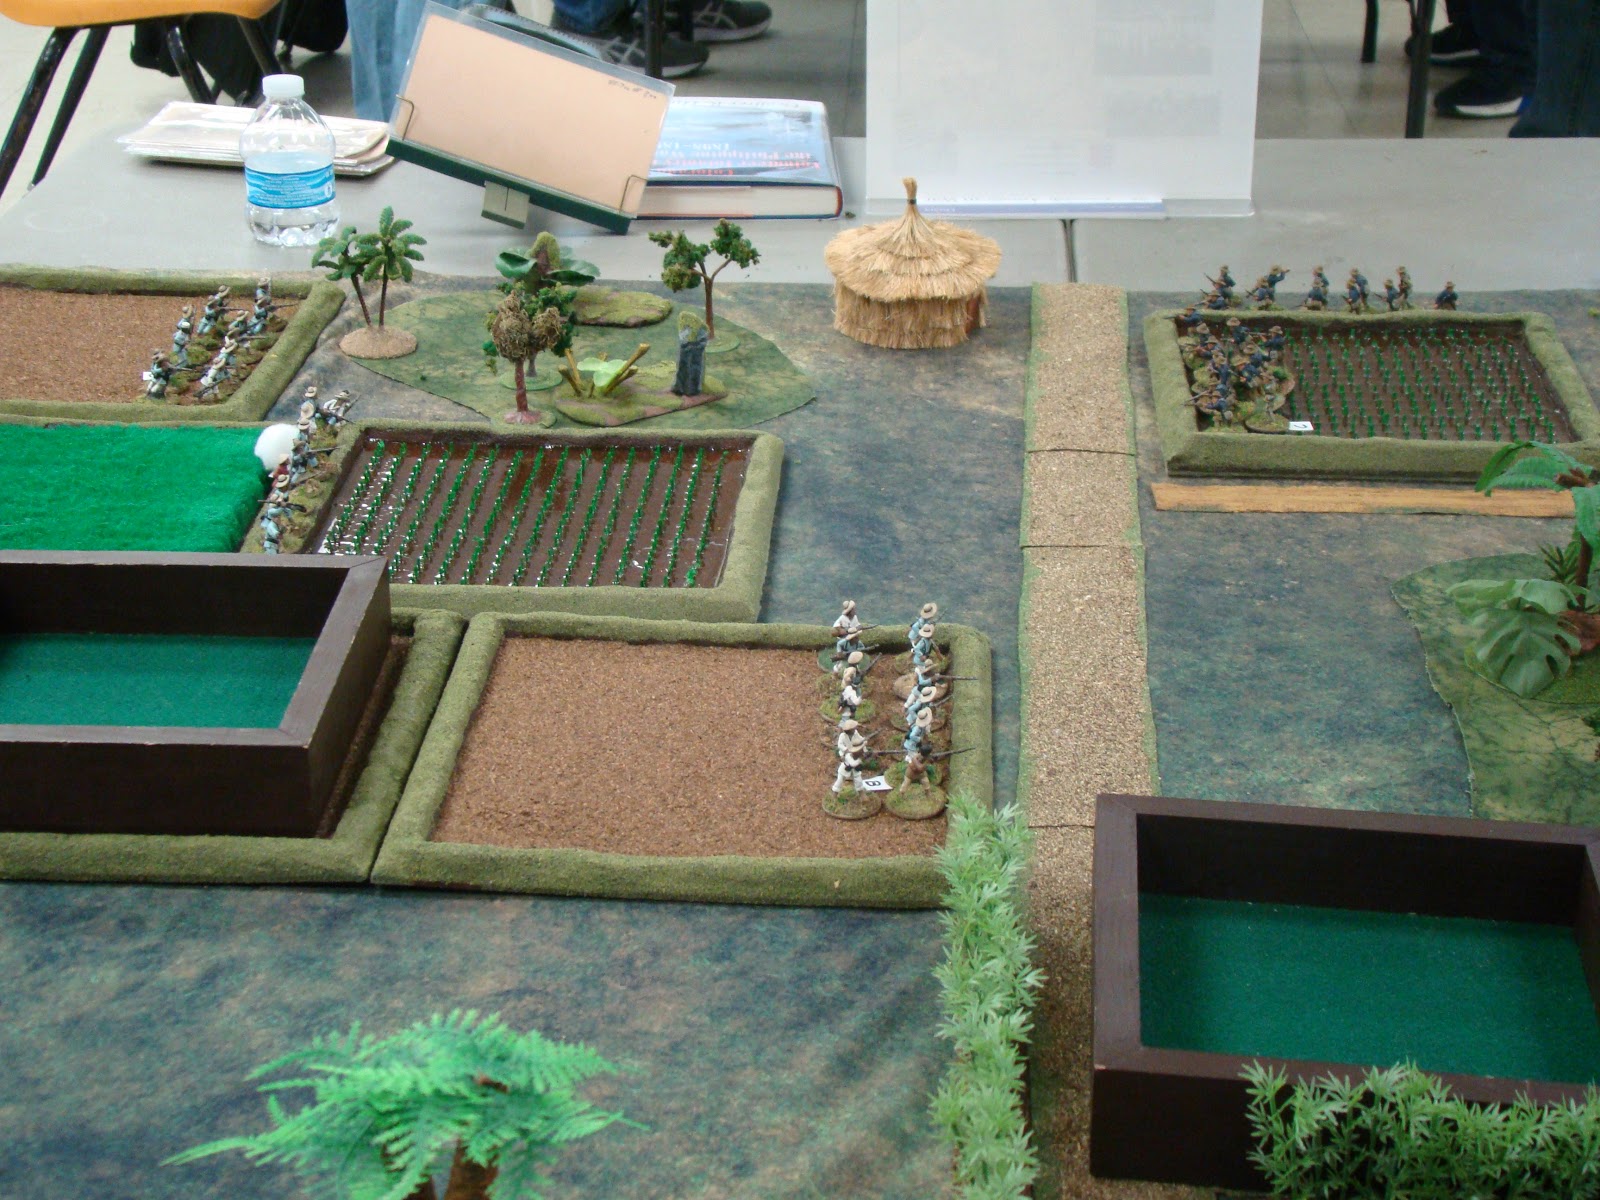
At our last club convention I put on a Philippine-American War skirmish scenario between Filipino forces and A Company, 1st Colorado Volunteer Regiment. The scenario was based on a real skirmish battle that happened on March 25, 1899 between well trained Filipino troops and US volunteer troops.
The 28mm figures are from 1898 Miniaturas and a few Tiger Miniatures thrown in. Rules used were The Men Who Would Be Kings with some house rules. Terrain that affected the battle was the jungle, rice paddies and hedges.
The objective for the the Filipino troops was to defend the area and prevent the US forces from breaking through. Just like the historic battle, the US forces were able to push the Filipino forces out of the area but it was a tough battle.
Initial deployment for the Filipinos and US forces started off table.
Two additional Filipino units would arrive as reinforcements.
A Filipino unit with the support of a bugler and flag defend the edge of a forested area.
A unit of volunteers charges pinned Filipinos defending the rice paddy berm.
The Filipino troops could not hold the berm.
The Filipino left flank trying to hold back the advancing US troops.
Ignore the two dice trays.
I have played these rules a couple of times and have enjoyed the battles with them. I think they are a good alternative to The Sword and The Flame rules. I will be using them for a Philippine-American War skirmish between a Company from the Colorado Regiment and a Filipino unit.
I have browsed through TMP and the The Men Who Would Be Kings Facebook page and found a few good house rules. I wish there was an easier assembled source of house rules to read through.
I can see myself adding more house rules as I continue to playtest and play more games. So the list below may be updated after I post it.
House Rules:
Commander-in-Chief figure added. This figure can move 12" and provide a +1 bonus to a Unit doing a Rally action within 6" of the figure.
Instead of rolling two d6 to see if a key figure is killed, a roll of a 1 on a d12 will kill a key figure. Roll the d12 when rolling for potential hits on unit. This will speed up play.
Each player and each Commander-in-Chief have a chit. This chit is drawn at random to determine which becomes active.
Units with a flag or bugle gives a leadership bonus of 1. The example is a leader who starts at a 7+, with a flag figure, the leadership would be 6+. If it also has a bugler, then it would be 5+.
Move and At the Double are merged together into Move action which is now basically At the Double (6" + 1d6" for movement).
When failing a rally, but not routing the player has two option with the unit:
Retreat to cover or in the open up to 12" and remove a pin marker.
Stay in cover and do not remove a pin marker.
Note the unit of 12 figures, one of the figures is replaced with a flag figure for the leadership bonus.
In the back the Commander-in-Chief is within 6" and can provide a leadership bonus for a Rally action.
American unit has a Bugler who gives a leadership bonus.
This is my third version of rice paddies and the most traditional looking version. This is a newly planted rice paddy. I was not overly impressed by what I saw online from other wargamers, so I worked on trying to create something more realistic. Probably still not as good as what model railroaders would make, but certainly better than what I've done in the past. Mine are not perfect and I welcome better versions than mine and please share how you make it (TMP, Facebook or your blog). This is not a fast technique, but maybe better paddies takes more time.
I have a fallow, newly planted and fully grown rice paddies. These are the three I'll be using in an upcoming wargame. They will be seen together in a future post on this blog.
Material:
Pre-Mixed Grout (sandstone)
Woodland Scenics Realistic Water
1/8" hardboard (from old poster frame back)
1/2" square dowels dowels
Masking tape
Sharp scissors
Liquitex Acrylic Color: Burnt Umber
Amsterdam: Permanent Green Light
JTT Field Grass (Light Green), item 95086
Optional: Some sort of green flock for the berm
Steps:
Assemble all the material. Make sure you have enough of the material to finish the project.
Cut the hardboard into a 10" x 10" square. I choose the square shape because I wanted to have multiple rice paddies beside one another.
Using the grout mix, build up the berms around the outside of the square hardboard. I went 1/2" high and flattened the top to give the impression that people can walk along the berm.
When the berms are dry (1-2 days), paint the berms and the inside of the rice paddy a dark brown.
Cut the wood dowels to the width of the rice paddy (10").
Cut grooves in the dowels every 1 cm along two opposite sides of the dowel. I made 19 notches on either side. This is where the grass will fit into.
Bunch up a bit of grass together and place it into each groove, and cover with a piece of masking tape. Try to pack the grass together as tight as you can and straight.
The gaps between dowels allows the Realistic Water dry better.
When all grooves have grass in them in the dowel, trim the bottom of the grass so when you place the dowel over the rice paddy on the berms, the grass touches the bottom of the rice paddy.
Repeat steps 5-8 until you have full coverage of rows.
Make sure the base is level before you pour the Realistic Water.
Pour the Realistic Water into the rice paddy. I think something slightly over 1/8" deep will work.
Arrange the dowels over the rice paddy. Make sure all the grass are embedded in the Realistic Water.
Let dry three days (not sure why it took me three days). Make sure the rice paddy is fully dry before moving to the next step.
Cut the grass with scissors near the bottom of the dowel, not near the water.
The grass will not be perfect, and there may be missing rice or issues. I fixed these by drilling a hole in the water and placing grass in the hole with the same process as 5-8 and then just poured a small amount of Realistic Water filling in and slightly around the hole. Cut the grass like in step 14.
When fully dry and happy with the outcome, trim the grass closer to the water. Height is completely up to you.
Paint the rice a Light Green. The JTT Field Grass is a bit too dark.
The berm can be left without flock if you want, but I chose to glue small green flock on the berms. I did not glue much flock on the inside of the berm.
I welcome any comments/suggestions. If things are still a unclear, I can certainly expand further in my tutorial.
For my 28mm Philippine-American War first scenario, I needed rice paddies. I have made 15mm rice paddies in the past with limited success and the same approach was not going to work for 28mm scale. I looked at what other people have made online and I am not impressed. I thought I would take a stab at making something better. The approach in this blog post is for a fully grown rice paddy. I will also be making a recently planted and fallow field versions.
For material I recommend using what you have available and what works for you. The material I used is what worked for me. I'm sure you can find cheaper or better material.
Material:
Pre-Mixed Grout (sandstone)
Woodland Scenics Realistic Water
Rust-oleum Gloss Spring Green spray paint
1/8" hardboard (from old poster frame back)
Light brown faux fur
Liquitex Acrylic Color: Burnt Umber
Optional: Some sort of green flock for the berm
Steps:
Assemble all the material. Make sure you have enough of the material to finish the project.
Cut the hardboard into a 10" x 10" square. I choose the square shape because I wanted to have multiple rice paddies beside one another.
Using the grout mix, build up the berms around the outside of the square hardboard. I went 1/2" high and flattened the top to give the impression that people can walk along the berm.
When the berms are dry (1-2 days), paint the berms and the inside one or two inches of the rice paddy a dark brown. No need to paint the whole board as the middle part will be covered with the faux fur.
Cut the faux fur into a 8" x 8" square.
Trim the fur around the outside of the square and then use an electric hair trimmer with the 1/2" comb attachment to cut down the fur to about a 1/2" length. The hair trimmer was only about $20.
Lay out the fur square flat and spray the fur with the green spray paint until you no longer see any brown fur. I recommend a brighter gloss green color (i.e. Gloss Spring Green by Rust-oleum) for the spray paint. If you miss a bit of brown fur deeper in the fur, that is okay. Most of what you see wargaming should be green.
When the fur square is dry, glue it into the middle of the hardboard. Make sure the outer edge of the fur square is flat to the hardboard.
With a small funnel, pour the Realistic Water into the gap between the fur and the berm all around the board. Let dry and repeat the application if not satisfied. It probably won't be perfect. No worries since I don't think it will be very visible when on the table.
The berm can be left without flock if you want, but I chose to glue small green flock on the berms. I did not glue any flock on the inside of the berm.
That's it, the rice paddy is good to go. There will be some warping, but I think when you lay it on a wargame mat it will sink into the mat slightly and the warping will not be noticed.